



Key takeaways
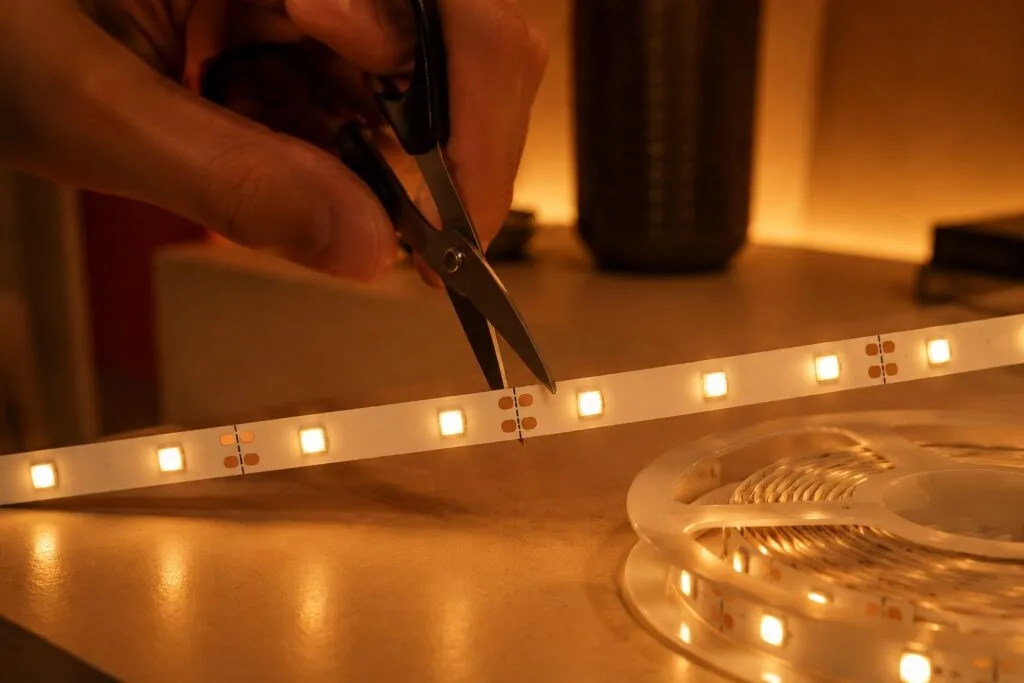
Yes, you can cut LED strip lights, but only across the copper pads marked with a scissor icon, roughly every 2 inches on a 12V strip and every 4 inches on a 24V one. Cut between the marks and that whole segment goes dark. Cut ends rejoin with a clip connector or solder.
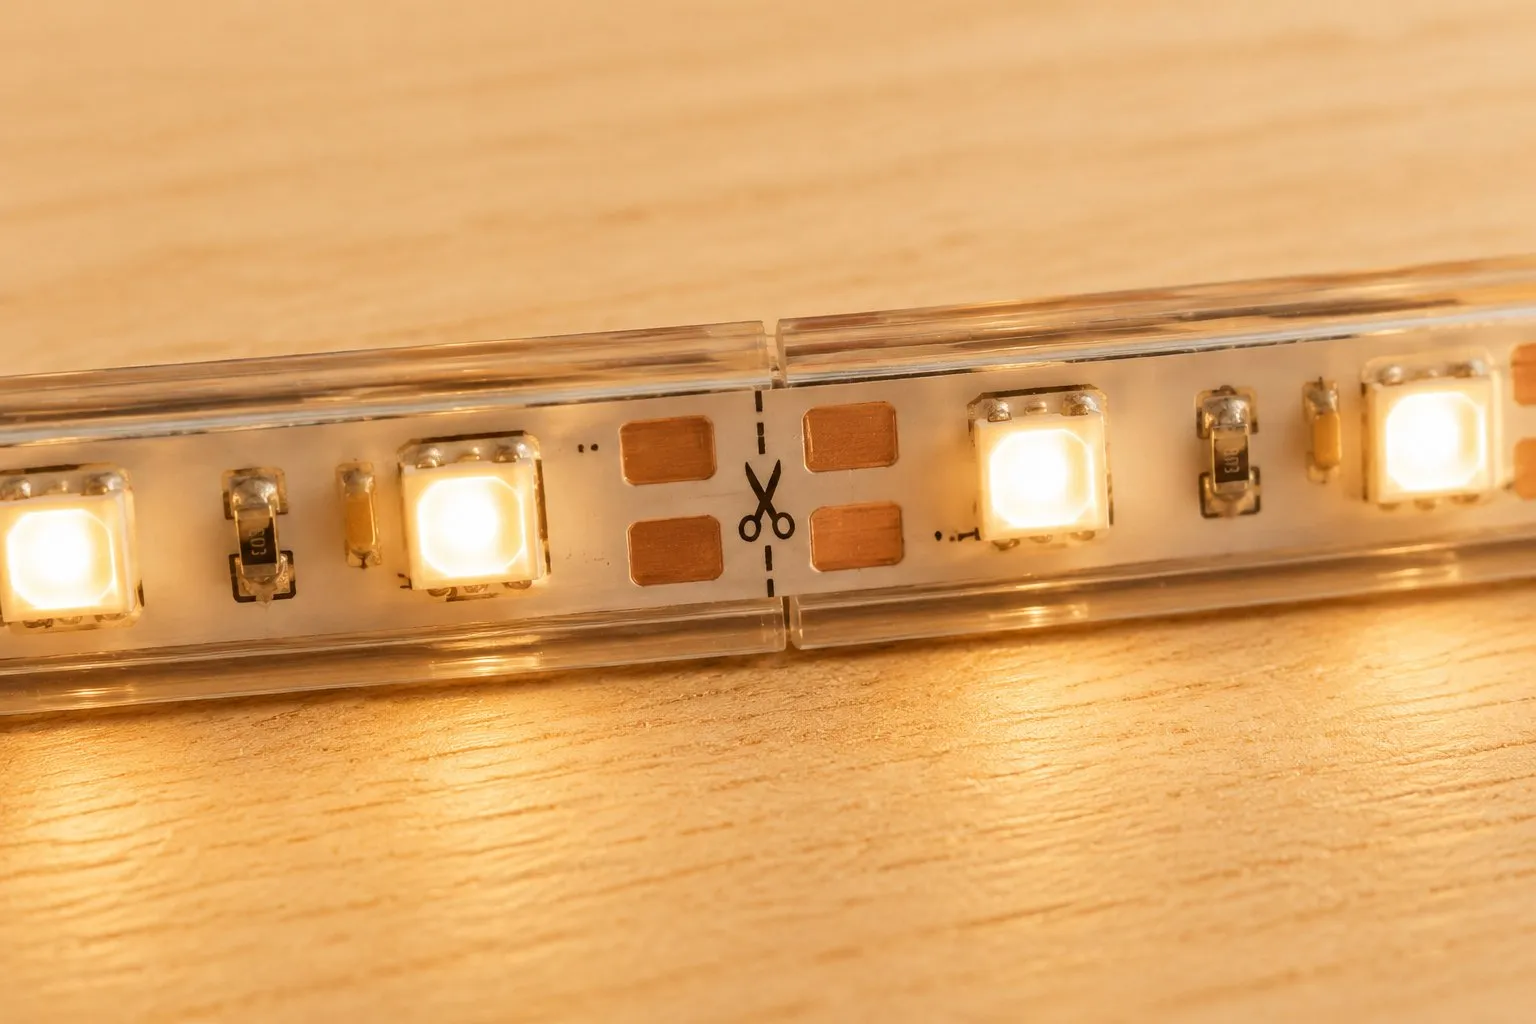
- Cut only on the marks. Each safe point sits on a pair of copper pads under a scissor icon or dashed line, and that same metal is where you reconnect later (HitLights).
- Spacing follows voltage. 12V strips cut every 3 LEDs (about 2 in); 24V every 6 LEDs (about 4 in) (HitLights). Addressable strips can cut between single LEDs.
- A wrong cut wastes LEDs. Slice between two points and that 3-to-6-LED segment stays dark for good and cannot be revived.
- Rejoin two ways. Solderless clip connectors are fastest; soldering 20 to 22 AWG wire to the pads is the most durable. Match plus to plus and minus to minus.
- Length has a ceiling. Adding pieces back is fine until the single-feed voltage-drop limit, about 16.4 ft at 12V and 32.8 ft at 24V (Super Bright LEDs).
SECTION 01Can you cut LED strip lights?
Yes, you can cut LED strip lights, but only at the fixed cut points printed along the tape, never at a random spot. A flexible strip is a repeating chain of tiny circuits wired in parallel, and each circuit closes at a pair of exposed copper solder pads. Those pads are the one place a cut leaves the piece you keep electrically whole.
Think of the strip as a train of identical cars rather than a single wire. Slice between the couplings, on a printed cut line, and every car ahead of the break still runs when you power it. Slice through the middle of a car and you sever the loop that feeds it, so that short section can never light again. This is why the answer is a confident yes with one condition attached: the marks are not a suggestion, they are the wiring.
Trimming to length is the everyday reason people reach for scissors, whether that is a retail buyer fitting a display shelf or a customer lining a cabinet. The good news is that cutting LED strip to length is normal and expected, and a strip trimmed to fit still delivers the same years of low-draw, energy-efficient light as the full reel. One caveat before you cut: not every strip is built to be modified, and some app-controlled strips with an inline control chip warn against it, so check the reel or spec sheet first.
SECTION 02Where do you cut LED strips?
You cut LED strips exactly on the copper pads, which repeat at a set interval marked by a small scissor icon or a dashed line across the tape. The whole question of where to cut LED strips comes down to reading those marks and aiming the blade at the center of the pad line, not to one side of it. Land off-center and you shave away the contact you would need to reconnect that end later. An app-controlled smart LED strip can be trimmed at these same points to fit a run.
The spacing is set by the strip’s voltage, because voltage decides how many LEDs share one parallel loop. On a standard 12V strip the cut points fall every 3 LEDs, roughly every 2 inches; on a 24V strip they fall every 6 LEDs, roughly every 4 inches (per HitLights’ guide to cutting LED strip lights, retrieved 2026-07-18). Addressable or digital strips are the exception, because a data line runs the length of the tape and lets you cut between individual LEDs for a much finer fit. Line-voltage 120V strips run the other way, with cut points spaced about a meter apart. The chart below shows how wide that range really is.
How far apart the cut points fall
Typical spacing between safe cut lines, by strip type · inches (always cut on the printed mark)
Source: HitLights, “Can You Cut LED Strip Lights? A Complete DIY Guide” (12V and 24V intervals); DERUN LED, “High vs Low Voltage LED Strip” (110-230V cut every ~1 m); addressable per-LED spacing is illustrative (typical 60 LEDs/m ≈ 0.65 in). Retrieved 2026-07-18. Values are typical; always cut on the printed mark.
For a buyer, the practical lesson is that the finer the cut interval, the closer you can trim to an exact length. That is a genuine point in favor of 12V and addressable strips for tight, odd cabinet runs, while wider-interval strips force you to round to the nearest mark.
SECTION 03What one wrong cut actually costs
Cut between two marked points and you lose the whole segment between them, about three LEDs on a typical 12V strip and six on a 24V one, and that dead length cannot be brought back. The reason is the parallel wiring: each little group of LEDs shares one loop that only closes at the copper pads. Sever the tape mid-loop and the current has no return path, so those LEDs stay off no matter how you reconnect the ends.
There is a second, quieter cost even when you cut correctly, and it is trim waste. Because you can only land the blade on the nearest mark, a run that needs an exact length gets rounded down to the last cut point before it. On a 24V strip with 4-inch spacing, a 37-inch shelf becomes a 36-inch strip, and the leftover piece is an offcut you set aside. That is not lost material if you keep it, but it is why the cut interval belongs on your planning list, not just the total length. For the wider job of sizing a run and its power supply, our under-cabinet LED buyer’s primer walks the full spec sheet.
SECTION 04How do you reconnect LED strips after cutting?
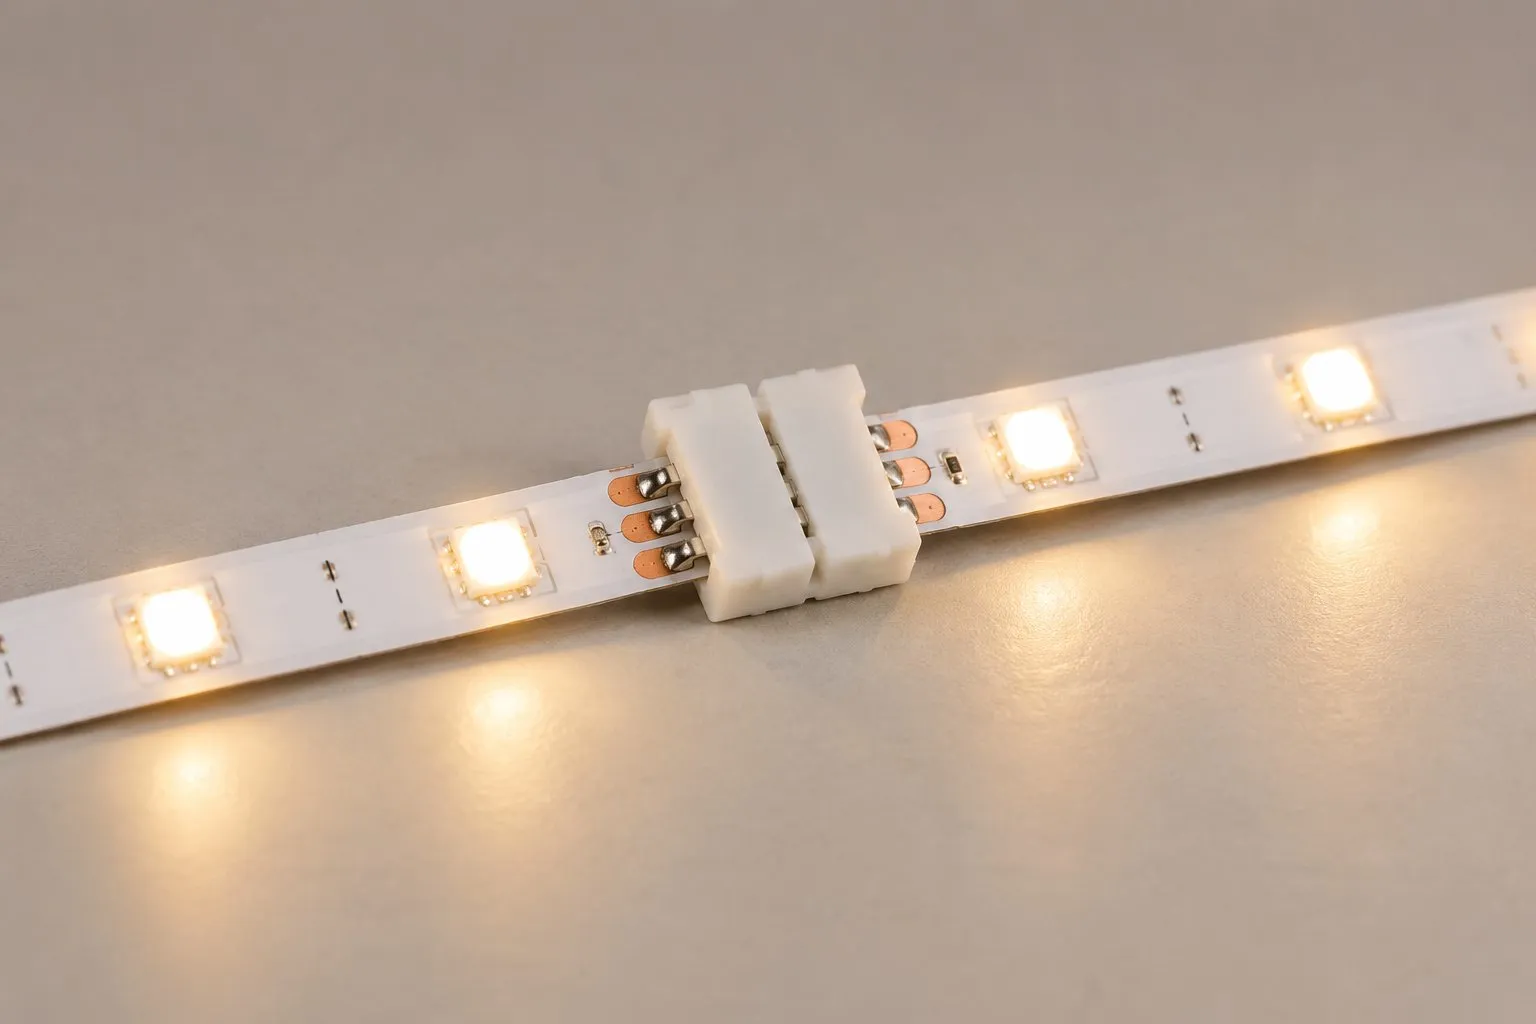
You rejoin a cut strip two ways, a solderless clip-on connector for speed or soldered wire for durability, and either way you must match polarity, positive pad to positive and negative to negative. A solderless connector clamps its metal pins straight onto the exposed copper pads, so it needs no iron and no heat, which is why LEDSupply recommends connectors as the tool-free alternative to soldering (retrieved 2026-07-18). Soldering costs more time but gives the most reliable joint, and HitLights notes vibration can eventually loosen a clip connection that is not clamped tightly or strain-relieved.
The soldered path is worth the extra minutes for permanent or high-movement installs. HitLights’ reconnection guide lists a fine-tip iron, solder, and small-gauge wire, commonly 20 to 22 AWG, then heat-shrink tubing over each joint (retrieved 2026-07-18). Whichever route you take, the sequence is the same, and the last step, a power-on test, is the one people skip and regret. That is the approach for an outdoor waterproof LED strip on a permanent outdoor run.
| Method | Best for | Tools | Durability |
|---|---|---|---|
| Solderless clip connector | Fast retrofits, renters, testing a layout | None; the connector clamps on | Good if clamped tight and strain-relieved |
| Soldered joint | Permanent, high-vibration, or hidden runs | Iron, solder, 20-22 AWG wire, heat-shrink | Highest; the pro-grade permanent join |
| Addressable (digital) strip | RGBIC and pixel effects | Data-pin connector or solder that keeps the data trace | Depends on preserving the signal line |
One trap catches people with color-changing tape: an addressable strip carries a data line as well as power, so a plain RGB connector will not pass the signal. Digital strips need a connector built for their pin layout, or a soldered joint that keeps the data trace intact, or the lights past the cut simply will not respond.
SECTION 05Can you make a cut strip longer, or reuse the offcut?
Yes to both, leftover pieces rejoin with connectors and you can extend a run, but only until you hit the single-feed length limit set by voltage drop. A clean offcut that still ends on a pad line is fully reusable: connect it like any other segment and it lights normally. Joining two pieces to make a longer strip works the same way, through a connector or a soldered link at each pad.
The ceiling is physics, not the connector. As current travels down a thin strip, resistance eats voltage, so the far end dims. A single power feed holds brightness for about 16.4 ft on a 12V strip and about 32.8 ft on a 24V strip before that drop becomes visible (Super Bright LEDs, 12V vs 24V guide, retrieved 2026-07-18). Push past it and you either inject power from both ends or start a fresh run from the driver. If you are adding length, size the power supply for the new total draw as well, which our buyer’s primer covers in full.
SECTION 06What to confirm before you order cuttable strip
Before you place a wholesale order, confirm three things on the spec sheet, the cut interval, the connector system, and the reel length, because together they decide how cleanly your team or your customers can trim the strip to fit. The cut interval tells you how close to an exact length a run can land. The connector system tells you whether a buyer can reconnect without a soldering iron, and for addressable strips whether the matching data connector is stocked. The reel length tells you how much usable strip comes off one feed before voltage drop forces a second run.
Those three numbers are what turn a generic strip into one your customers can actually install, and they are easy to ask for up front. BeginLighting supplies cuttable LED strip lights and works with partner factories on wholesale and private-label runs, so you can specify the cut interval, connector type, color temperature, and packaging that suit your assortment. Pricing is quoted per order against your spec.
Source cuttable LED strip lights, spec’d your way
Tell us your run lengths, voltage, color temperature, and connector preference. We supply wholesale and private-label LED strip lights against your spec, with pricing quoted per order.
Frequently asked questions
Can you cut LED strip lights anywhere along the strip?
No. You can cut LED strip lights only at the fixed cut points, marked by a scissor icon or a dashed line running across a pair of copper pads. On a standard 12V strip those points fall every 3 LEDs, roughly every 2 inches; on a 24V strip every 6 LEDs, roughly every 4 inches. Cutting between two marks breaks the circuit for that segment and it stops lighting.
Where are the cut lines on an LED strip?
They sit on the exposed copper pads spaced along the back or face of the strip, usually with a small scissor symbol or a dotted line printed across them. Those same pads are the electrical contacts you reconnect to later, so the safest habit is to cut through the center of the pad line, not to one side of it.
Will a cut LED strip still work after cutting?
Yes, as long as the cut lands on a marked point. The piece you keep still lights normally when powered, because each segment between cut points is a self-contained parallel circuit. Only the short segment you sliced through goes dark, and on a 12V strip that is about three LEDs, on a 24V strip about six.
Can you reconnect an LED strip once you have cut it?
Yes. Two methods work: a solderless clip-on connector that clamps onto the copper pads for a fast, tool-free join, or soldered wire (commonly 20 to 22 AWG) for the most durable connection. Either way, match polarity, positive pad to positive and negative to negative, and for RGB or addressable strips align every channel.
Can you cut addressable or RGBIC LED strips?
Usually yes, and often at a finer interval, because addressable strips carry a data line that lets you cut between individual LEDs. The catch is reconnection: a plain RGB connector will not pass the data signal, so a digital strip needs a connector made for its pin layout or a soldered joint that preserves the data trace.
Sources
- HitLights, “Can You Cut LED Strip Lights? A Complete DIY Guide.” hitlights.com, retrieved 2026-07-18.
- HitLights, “How to Reconnect LED Strip Lights After Cutting.” hitlights.com, retrieved 2026-07-18.
- HitLights, “Soldering vs Solderless Connectors: Best Way to Connect LED Strip Lights.” hitlights.com, retrieved 2026-07-18.
- LEDSupply, “LED Strip Connectors: Alternative to Soldering.” ledsupply.com, retrieved 2026-07-18.
- Super Bright LEDs, “12-Volt vs. 24-Volt LED Strip Lights: What’s the Difference?” superbrightleds.com, retrieved 2026-07-18.
- DERUN LED, “The Difference Between High Voltage 110-240V and Low Voltage 12V/24V LED Strip Light.” derunledlights.com, retrieved 2026-07-18.
BeginLighting supplies cuttable LED strip lights sourced from vetted partner factories. Cut intervals and specifications in this guide are drawn from published manufacturer data and the industry references cited above; verify final specs against samples before ordering.
Connectors or solder: what ships alongside a cuttable strip
The cut itself is rarely what generates a return; the reconnection is. Two paths exist, and a buyer should decide which one the target shopper is actually capable of before the assortment is locked.
Solderless connectors
Led strip light connectors are the clip-on or push-fit parts that rejoin a cut strip without heat, and they are the right default for a consumer SKU: no tools, no skill, no risk of lifting a copper pad. The trade-off is contact quality. A cheap clip on a wide 24V run can drop voltage, flicker, or work loose behind a cabinet months after install. Specify connector width against strip width, insist on proper strain relief, and require that the sample kit ships with exactly the connectors the production run will use.
Soldered joints
Led strip soldering produces the most reliable and lowest-profile joint, which is why installer and contractor channels still prefer it. It is not a consumer instruction. If the channel is DIY retail, treat soldering as an advanced option in the manual rather than the primary method, and do not accept a strip whose pads are too small or too thinly plated to survive a single pass with an iron.
How many connectors to attach to the buy
Attach rate is the part most first-time buyers under-plan. A shopper who cuts a strip needs at least one connector per cut, and corners on a kitchen run or a stair run add more again. Under-supplying connectors is the fastest route to a one-star review that reads as a product fault when it is really a kit-contents fault. Work out the expected cuts per install for your typical shopper, then size the accessory buy against that rather than against a flat percentage of units.
LED strip is one of our own lines, built alongside the warm-glow indoor lighting on the same Foshan floor. On strip that means the strip, the connector family and the power supply are specified together in-house, sampled before commitment and quoted as one package. Send the run lengths and voltage you need and we will price strip, connectors and drivers together through Request a Quote.
Connectable Strip Lights and What to Specify
Connectable strip lights are the ones a buyer can trim and then rejoin without a soldering iron, and that is a separate line on the spec sheet from cuttability. Almost every strip sold is cuttable. Far fewer ship with a connector system that actually holds: a clip sized to the exact strip width, a matching pin layout on addressable runs, and spare connectors in the box so an installer is not hunting for one mid-job.
When you ask a factory for connectable strip lights, ask for the strip width in millimetres, the connector part number, and whether corner and gap connectors exist in the same family. A strip that is cuttable but not connectable creates returns, because the customer cuts first and finds the joint problem second. BeginLighting builds cuttable and connectable strip in plain RGB and addressable formats, and quotes the strip and its connector family together rather than separately.
